Although our hatching season has ended, this is the time of year we have money to invest in equipment and livestock for our farm’s future. With that in mind, I thought it would be a great time to follow up on our first post about hatching poultry and take an in-depth look at the kind of equipment you need to be successful hatching poultry for profit!

Hatching equipment includes items like an incubator, heat lamp, extra bulbs, and a chick waterer.
Some birds will “go broody” and sit on eggs for long enough to hatch. Others will not, and you’ll just end up with a very smelly mess when they do it wrong. While it’s wonderful to watch a mother hen and her newborn chicks, if you’re trying to make a small business out of baby poultry, you’ll want to use an incubator. Incubators vary widely in cost and performance. I started out with an inexpensive Styrofoam incubator, which can be found in feed stores or online. These are a good entry level model, but are not built to stand up to years of use. You’ll be able to hatch about 40 eggs each time you set. If you have to option to buy one with automatic turners, I recommend them. Eggs need to be shifted around to mimic a mother hen’s movement and prevent the chick inside from developing lopsided. Without an automatic turner, you’ll need to turn each egg over by hand multiple times per day for the duration of incubation- 3 weeks for chickens, 4 weeks for most other birds. The incubator will have a water tray, you’ll need to read the directions to keep the proper humidity for egg development. Most Styrofoam incubators use a wafer-style heating regulator, and these can be tricky. You’ll need a thermometer inside to see the temperature. Make sure you’re reading a steady 100 degrees Fahrenheit for 24 hours or more before you put eggs inside. For best results, you’ll need to keep it in a room with a constant temperature, not an unheated outbuilding.
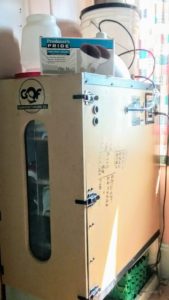
When we got serious about hatching, we invested in a cabinet-style incubator. It has 3 levels of trays which turn automatically, and can set 66 eggs on each level. The thermometer is digital. I set it to 100 degrees when I turn in on in February, and I make no adjustments throughout hatching season. It also has a gravity-fed automatic watering system. I make sure the 5 gallon bucket on top has water in it, and clean the water pan inside the incubator every few weeks, and again, it does the rest for me. My only real tasks are setting eggs and keeping track of when they are going to hatch. Two days before the scheduled hatch date, eggs must be taken out of the moving shelves and put in the draw at the bottom to hatch. It’s a huge time saver to have so much of the process automated, and I can hatch up to 66 eggs per week continuously rather than 40 every three weeks. Of course, this comes at a much higher price. While Styrofoam incubators can be found for around $100 new, one like mine will cost closer to $1,000. Other options exist- sturdier small-scale ones can be found online and in catalogs, and it’s even possible to build an incubator with household materials like a cooler. There are no wrong options, just what is right for you.
After the eggs hatch, baby poultry will need enclosed brooder pens with a heat lamp. Closing it in keeps them safe from barn kitties and other predators, and the heat lamp is the substitute for mama’s warmth that keeps them alive. I use small elevated pens with wire bottoms that double as rabbit pens. For newborn chicks, I simply cover the wire with cardboard to keep out drafts and prevent the chicks from getting stuck. Putting a layer of newspaper over the cardboard makes an easy way to keep the pen clean. You can remove soiled paper as needed and replace it. How many pens you’ll need will depend on how many different kinds of birds you plan on hatching, and how often. While I put birds a week or so apart in age together, mixing older birds with younger/smaller ones often leads to fatalities when the smaller ones get trampled.
Heat lamps have a bowl-shaped guard to reflect light and warmth in one spot, and are cheap and easy to find at any feed store or online. In my experience clear and red-tinted bulbs work equally well. I highly recommend keeping extra bulbs around, as they tend to burn out quickly. Watch your chicks to determine if the heat lamp is the correct distance from the pen floor. If your chicks are huddled together directly under it, they are cold and the lamp needs to be lowered. If they are in the corners furthest from the light, they are hot, and the lamp should be raised up. Chicks running around in all directions mean that the lamp is at a good level and the birds are comfortable.

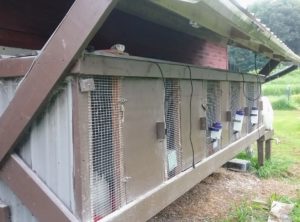
Our outdoor brooder pens are used for chicks as well as rabbits. They feature electric for the heat lamps, and the gutter catches rainwater that is stored in the plastic container at far right.
Small chick feeders and waterers are inexpensive and also easy to find at any feed store. Chick feeders generally have a top with holes in it so chicks can eat without getting into the feeder. This keeps the feed clean and reduces waste. You can find waterer bases that screw on to canning jars, or get larger ones that are two plastic pieces. Whether you need a pint, quart, gallon or 5 gallon waterer will depend on the number of chicks you have in your pen, the temperature in your area, as well as the type of bird. Ducks, not surprisingly, go through the most water! You’ll also need a feed specifically for chicks. If you’re raising turkeys, quail, or peacocks they will benefit from a high protein starter (20% or higher, we feed 24%), and be aware that medicated feed designed for chickens can be fatal to other poultry. The final item I recommend when you get ready to start selling baby birds is empty cardboard boxes. Have a few around because a percentage of my chick customers each year arrive with no container to take them home.


